Building your own Arduino-powered air compressor is a hands-on project that takes the guesswork out of managing air pressure. Instead of manually flipping switches or relying on a basic mechanical cutoff, the Arduino monitors a pressure sensor and automatically controls a relay to turn the compressor on or off. This setup ensures safe, consistent pressure without constant supervision.
Whether you want a smarter air system for airbrushing, small pneumatic tools, or simply to explore real-world automation beyond blinking LEDs, this project is a practical way to learn. You’ll get firsthand experience with sensors, relays, and control logic, all while creating something genuinely useful.
In this guide, we’ll cover the essential components, how the system works step by step, and key safety precautions. If you’re ready to move beyond theory and actually build a functional, automated air compressor, you’re in the right place.
A standard air compressor typically runs until you manually switch it off or a built-in mechanical cutoff stops it. Adding an Arduino to the system makes the process much smarter and fully automated.
Here’s the basic operation:
- A pressure sensor constantly monitors the tank’s air pressure.
- The Arduino reads the sensor data in real time.
- If the pressure drops below your set minimum, the Arduino activates a relay to turn the compressor ON.
- When the tank reaches your maximum set pressure, the Arduino shuts the compressor OFF.
With this setup, you gain precise, hands-free control over your compressor. You can also expand the system with additional features, such as an LCD display, alarms, or data logging. Beyond convenience, this project teaches a fundamental engineering principle: closed-loop control. The system monitors itself and reacts automatically—no manual intervention required.
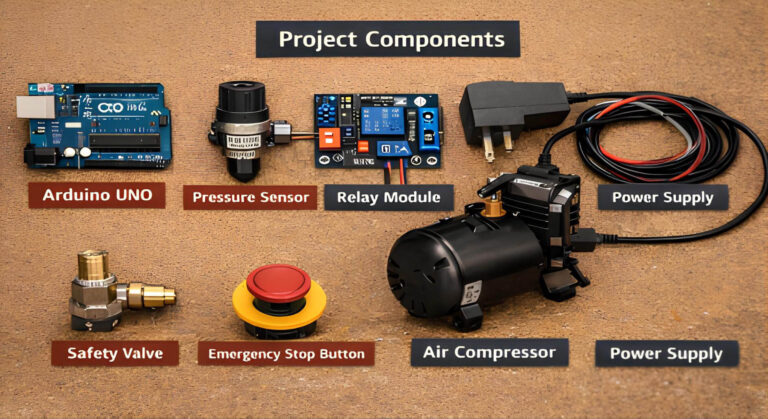
Below is a list of the essential components for building an Arduino-controlled air compressor. Specific models may vary depending on your setup, but these are the core items you’ll need to get started.
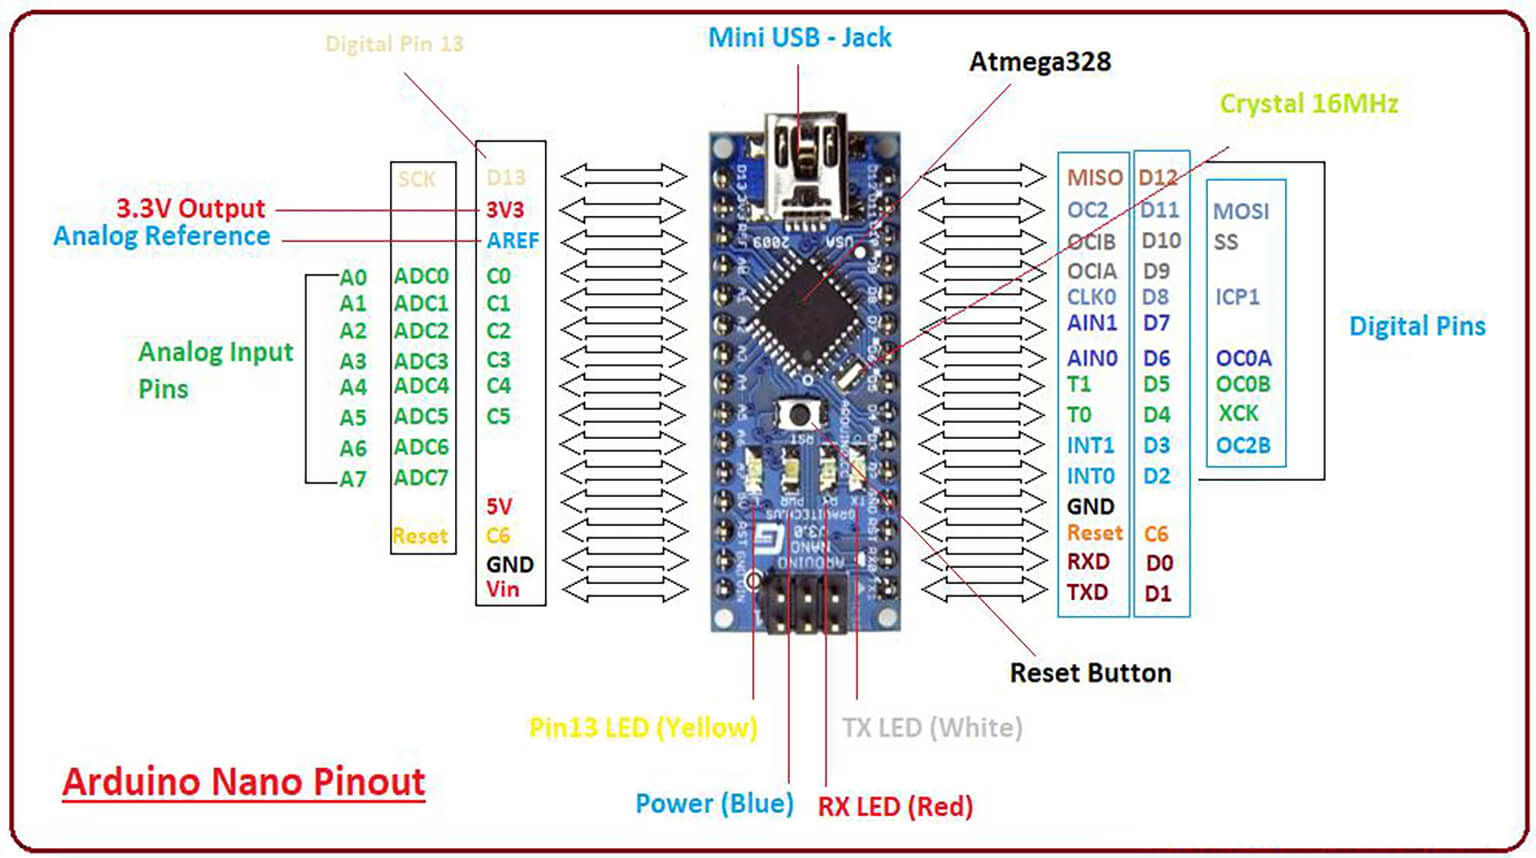
An Arduino Uno or Nano is sufficient. Both have enough analog inputs and digital outputs for pressure sensing and relay control.
Use a small compressor with a tank, AC or DC. A tank is important—it smooths pressure changes and reduces frequent switching. Verify the compressor’s voltage and current before selecting the relay.
Choose an analog pressure sensor rated for your system’s maximum pressure. Sensors with a 0.5–4.5V output are ideal and easy to read using Arduino’s ADC.
A relay is required to switch the compressor safely. Use a relay module with opto-isolation and a current rating comfortably above the compressor’s startup current.
5V or 7–12V supply for the Arduino
Separate power source for the compressor
Do not power the compressor from the Arduino supply.
Install a mechanical pressure relief valve on the tank. This is non-negotiable. Software alone is not a safety system.
Use pressure-rated hoses and fittings. Any air leak will cause unstable pressure control and excessive compressor cycling.
Add a physical emergency stop switch that cuts power to the compressor immediately.
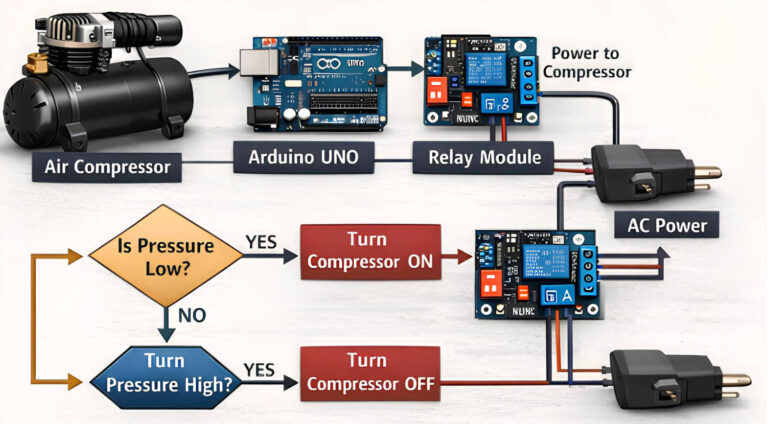
At its core, this project is a simple closed-loop pressure control system. The Arduino continuously monitors tank pressure and decides when the compressor should run.
Control Flow
- The compressor fills the air tank, increasing internal pressure.
- A pressure sensor mounted on the tank continuously measures this pressure.
- The sensor outputs a voltage proportional to the current pressure.
- The Arduino reads this voltage through an analog input and converts it into a pressure value.
- The measured pressure is compared against two predefined thresholds: Cut-in pressure (compressor ON) & Cut-off pressure (compressor OFF)
- When pressure drops below the cut-in value, the Arduino activates the relay.
- The relay switches power to the compressor, starting it.
- When pressure reaches the cut-off value, the Arduino deactivates the relay.
- Power to the compressor is removed, and the compressor stops.
This loop runs continuously in the background.
Why This Works Well
Using separate cut-in and cut-off thresholds prevents rapid on/off switching and reduces mechanical wear on the compressor. Once configured, the system maintains stable pressure automatically, with no manual intervention required.
From the user’s perspective, the compressor simply “just works”—turning on when air is needed and shutting off when the tank is full.
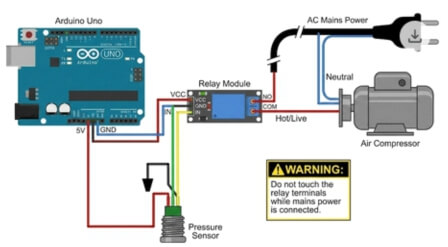
The pressure sensor is powered directly from the Arduino and outputs an analog voltage proportional to tank pressure.
- VCC → Arduino 5V
- GND → Arduino GND
- Signal → Arduino A0
As pressure increases, the sensor’s output voltage rises. The Arduino reads this voltage on A0 and converts it into a pressure value in software.
The relay module allows the Arduino to safely control the compressor without exposing the microcontroller to high voltage.
- Relay VCC → Arduino 5V
- Relay GND → Arduino GND
- Relay IN / SIG → Arduino D7
Pin D7 is used as a digital output to switch the relay on and off.
| Component | Pin Label | Arduino Pin | Purpose |
|---|
| Pressure Sensor | VCC | 5V | Sensor power |
| Pressure Sensor | GND | GND | Common ground |
| Pressure Sensor | Signal | A0 | Analog pressure input |
| Relay Module | VCC | 5V | Relay logic power |
| Relay Module | GND | GND | Relay ground |
| Relay Module | IN | D7 | Relay control signal |
⚠️ This section involves mains or high-current wiring. Proceed only if you understand electrical safety.
- Cut the compressor’s power cord.
- The Neutral wire connects directly to the compressor.
- The Hot (Live) wire is routed through the relay:
- Hot → COM terminal
- NO (Normally Open) terminal → Compressor
When the Arduino activates the relay, COM and NO are connected, supplying power to the compressor. When the relay is off, the circuit remains open.
/*
  Arduino Air Compressor Controller
  Monitors pressure via an analog sensor and controls a relay.
*/

// --- Configuration ---
const int SENSOR_PIN = A0;      // Pressure sensor signal pin
const int RELAY_PIN = 7;        // Relay control pin

// Pressure Settings (Adjust these to match your system)
const int CUT_OFF_PRESSURE = 90; // PSI: Compressor OFF
const int CUT_IN_PRESSURE = 60;  // PSI: Compressor ON

// Sensor Calibration (0.5V = 0 PSI, 4.5V = Max PSI)
const float MAX_SENSOR_PSI = 100.0;
const float MIN_SENSOR_VOLTAGE = 0.5;
const float MAX_SENSOR_VOLTAGE = 4.5;

void setup() {
  Serial.begin(9600);           // For debugging
  pinMode(RELAY_PIN, OUTPUT);   // Relay control
  pinMode(SENSOR_PIN, INPUT);   // Pressure sensor input

  digitalWrite(RELAY_PIN, LOW); // Start with compressor OFF
  Serial.println("System Initialized...");
}

void loop() {
  // 1. Read sensor
  int rawADC = analogRead(SENSOR_PIN);

  // 2. Convert ADC (0-1023) to Voltage (0-5V)
  float voltage = rawADC * (5.0 / 1023.0);

  // 3. Convert Voltage to Pressure (PSI)
  float pressure = 0.0;
  if (voltage >= MIN_SENSOR_VOLTAGE) {
    pressure = ((voltage - MIN_SENSOR_VOLTAGE) * MAX_SENSOR_PSI) /
               (MAX_SENSOR_VOLTAGE - MIN_SENSOR_VOLTAGE);
  }

  // 4. Debugging output
  Serial.print("Voltage: "); Serial.print(voltage);
  Serial.print("V | Pressure: "); Serial.print(pressure); Serial.println(" PSI");

  // 5. Control logic (with hysteresis)
  if (pressure < CUT_IN_PRESSURE) { digitalWrite(RELAY_PIN, HIGH); // Turn compressor ON Serial.println("Status: COMPRESSOR ON"); } else if (pressure >= CUT_OFF_PRESSURE) {
    digitalWrite(RELAY_PIN, LOW);   // Turn compressor OFF
    Serial.println("Status: COMPRESSOR OFF");
  }

  delay(500); // Prevents noise and rapid cycling
}
Working with compressed air and electricity can be dangerous. A single mistake may damage equipment or, worse, cause injury. Follow these safety practices carefully.
Always install a mechanical safety valve. Do not rely solely on software. If the Arduino or relay fails, this valve acts as your last line of defense against over-pressurization and potential tank rupture.
Use a relay module with opto-isolation. Keep all high-voltage wiring physically separated from the Arduino’s low-voltage circuits to prevent shorts or accidental shocks.
Install a physical emergency stop button. This allows you to instantly cut power to the compressor in case of a malfunction or emergency.
Ensure the relay is rated for your compressor’s current draw. Do not guess—always verify the specifications.
Use wires rated for the voltage and current of your system.
Confirm that the pressure sensor’s range covers the maximum pressure your system will reach.
- Never Test Without a Load
Never run the compressor with the air outlet blocked. Doing so can quickly create dangerous pressure spikes that may damage the tank or fittings.
| Mistake | Fix |
|---|
| Skipping the safety valve | Always install a mechanical relief valve. No exceptions. |
| Using an underrated relay | Check the compressor’s current and select a relay with adequate capacity. |
| Forgetting hysteresis | Add a small pressure buffer between ON and OFF thresholds to prevent rapid cycling. |
| Sharing power supplies incorrectly | Keep the Arduino’s power supply isolated from the noisy compressor circuits. |
| Poor hose connections | Use proper fittings and check for leaks using soapy water. |
Once the basic system is running reliably, you can enhance your setup with the following:
- LCD or OLED display to show live pressure readings.
- Warning LEDs or buzzer for system alerts.
- Data logging to an SD card to track performance over time.
- ESP32 upgrade for Wi-Fi connectivity and remote monitoring.
- Solid-state relay for quieter, more reliable switching.
- Temperature monitoring to track compressor health.
These enhancements can transform a simple DIY project into a smart, connected pneumatic system, combining safety, control, and automation.
Building an Arduino-controlled air compressor is more than just a fun DIY project—it’s a hands-on way to explore electronics, sensors, and applied engineering in a real-world context. You’ll gain practical experience with control logic, safety practices, and system design, all while creating a functional tool you can use every day.
At PCBCool, we don’t just handle large-scale B2B projects for our industrial clients. We also provide services tailored for hobbyists and DIY electronics enthusiasts. Whether you’re experimenting with Arduino projects, prototyping small tools, or exploring custom automation setups, we can help you source components, design PCBs, and even assist with cost-effective fabrication—all while maintaining the high quality our industrial clients expect.
Your next DIY project doesn’t have to be limited by resources or expertise. PCBCool is here to make your electronics ideas practical, safe, and achievable.