Interested in building your own weather station with an ESP32? You’re in the right place.
This DIY project combines microcontrollers, sensors, and basic IoT concepts into a practical, hands-on experience. It’s perfect for electronics enthusiasts—whether you’re a hobbyist or a professional looking to prototype quickly.
In this guide, I’ll walk you step by step through building a functional ESP32 weather station. You’ll learn which components to use, how to connect them, and how the system works together.
No need to be an expert—if you can identify a resistor from an LED, you’re ready to get started. By the end, you’ll have a working weather station that’s easy to expand with additional sensors or features.
An ESP32 weather station is a compact, self-contained setup that does three main things:
- Collects weather data from sensors.
- Processes that data using an ESP32 microcontroller.
- Displays or transmits the information, either on a local screen or online.
Most DIY weather stations track core parameters like temperature, humidity, and optionally air pressure. The ESP32 is an excellent choice for this project—it combines built-in Wi-Fi, low power consumption, and enough processing power to handle multiple sensors and display outputs seamlessly.
Before you start, gather the essential components for your ESP32 weather station:
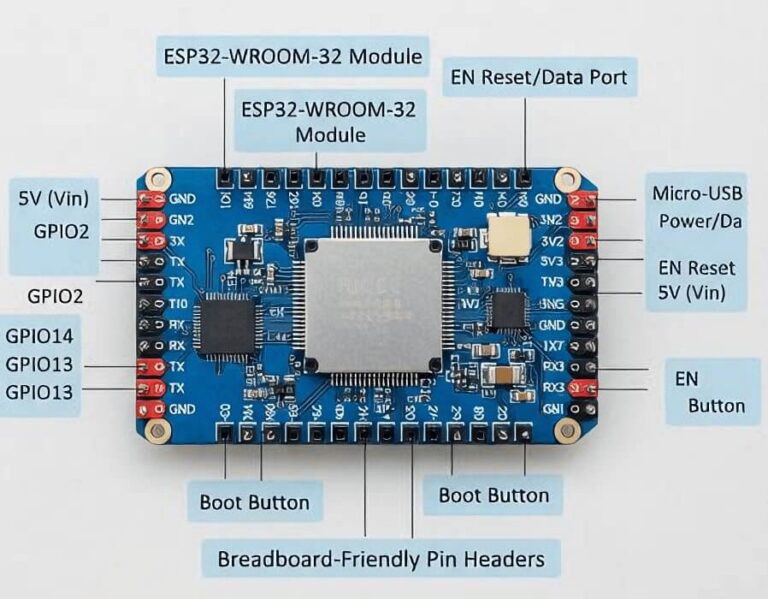
This is the heart of your project. It reads data from the sensors, processes it, and sends it to a display or online platform.
These sensors measure temperature and humidity. The DHT22 is more accurate and suitable for slightly more advanced projects, while the DHT11 is inexpensive and beginner-friendly.
A small OLED screen can show live readings directly on your station. It’s not required, but it makes your setup more interactive and visually engaging.
- Resistors and Jumper Wires
Use these for stable connections and signal integrity between the ESP32 and sensors.
You can power your ESP32 via a USB cable from your computer or a dedicated 5V wall adapter.
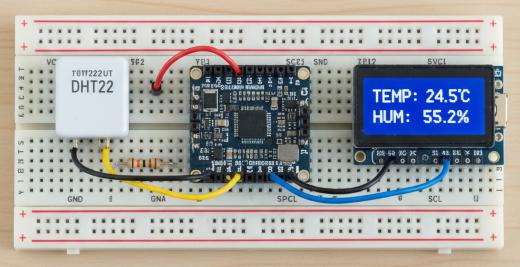
| Component | Pin | Connects to ESP32 | Notes |
|---|
| DHT Sensor | VCC (+) | 3V3 | Power |
| | GND (-) | GND | Ground |
| | DATA / OUT | GPIO 4 | Data Signal |
| OLED Display (Optional) | VCC | 3V3 | Power |
| | GND | GND | Ground |
| | SCL | GPIO 22 | Clock Line |
| | SDA | GPIO 21 | Data Line |
Tip:
- If you are using a “raw” 4-pin DHT sensor (white grid casing), place a 10kΩ pull-up resistor between VCC and DATA.
- If your sensor comes pre-mounted on a small PCB (3 pins total), this resistor is typically built in.
This wiring setup ensures stable sensor readings and smooth communication with the ESP32, forming the backbone of your weather station.
- Connect the ESP32’s 3.3V pin to the positive rail on your breadboard and the GND pin to the negative rail.
- Connect the sensor’s VCC to the ESP32’s 3.3V (or 5V if your sensor supports it).
- Ensure all grounds are connected together. Proper grounding is crucial for stable sensor readings and reliable operation.
- Connect the sensor’s DATA pin to GPIO 4 on the ESP32.
- If your sensor requires it, add a 10kΩ pull-up resistor between VCC and DATA to stabilize the signal.
- This ensures the ESP32 reads accurate temperature and humidity values.
- For an OLED screen, connect SDA to GPIO 21 and SCL to GPIO 22, which forms the standard I²C interface.
- Power the OLED from the ESP32’s 3.3V and GND pins.
- Place the ESP32 near the center of the breadboard for easy routing.
- Position the DHT sensor and OLED display close by.
- Use jumper wires to connect components according to the wiring table in the previous section.
- Keep wiring neat to minimize noise and maintain reliable sensor readings.
We’ll use the Arduino IDE, which simplifies working with sensors and displays through libraries. The program will repeatedly read sensor data and output it either to the Serial Monitor or an OLED display.
- Initialization: Activate the DHT sensor and OLED display.
- Loop: Wait a short interval between readings (about 2 seconds).
- Read Sensor Data: Acquire temperature and humidity from the DHT sensor.
- Validation: Check that readings are valid; if not, retry.
- Output: Print values to the Serial Monitor and update the OLED display.
- Repeat: Continue in a loop for continuous monitoring.
Before uploading code, install the necessary libraries in Arduino IDE:
- Open Arduino IDE.
- Navigate to Sketch → Include Library → Manage Libraries.
- Search for and install the following libraries:
- DHT sensor library by Adafruit
- Adafruit SSD1306
- Adafruit GFX Library
#include
#include
#include
#include

// — CONFIGURATION —
#define SCREEN_WIDTH 128 // OLED display width, in pixels
#define SCREEN_HEIGHT 64 // OLED display height, in pixels

// Declaration for SSD1306 display connected via I2C (SDA, SCL)
Adafruit_SSD1306 display(SCREEN_WIDTH, SCREEN_HEIGHT, &Wire, -1);

#define DHTPIN 4          // Digital pin connected to DHT sensor
#define DHTTYPE DHT11     // Uncomment for DHT11, use DHT22 for DHT22/AM2302

DHT dht(DHTPIN, DHTTYPE);

void setup() {
  Serial.begin(115200);

  // Initialize DHT sensor
  dht.begin();

  // Initialize OLED display
  if(!display.begin(SSD1306_SWITCHCAPVCC, 0x3C)) {
    Serial.println(F("SSD1306 allocation failed"));
    for(;;);
  }

  display.clearDisplay();
  display.setTextColor(WHITE);
  display.setTextSize(1);
  display.setCursor(0, 10);
  display.println("Weather Station");
  display.println("Initializing...");
  display.display();
  delay(2000);
}

void loop() {
  // Wait 2 seconds between measurements
  delay(2000);

  // Read humidity and temperature
  float h = dht.readHumidity();
  float t = dht.readTemperature();

  // Validate readings
  if (isnan(h) || isnan(t)) {
    Serial.println(F("Failed to read from DHT sensor!"));
    return;
  }

  // Print to Serial Monitor
  Serial.print(F("Humidity: "));
  Serial.print(h);
  Serial.print(F("%  Temperature: "));
  Serial.print(t);
  Serial.println(F("°C"));

  // Display on OLED
  display.clearDisplay();

  display.setTextSize(1);
  display.setCursor(0, 0);
  display.println("Room Condition:");

  display.setTextSize(2);
  display.setCursor(0, 15);
  display.print("T: ");
  display.print(t);
  display.println("C");

  display.setCursor(0, 40);
  display.print("H: ");
  display.print(h);
  display.println("%");

  display.display();
}
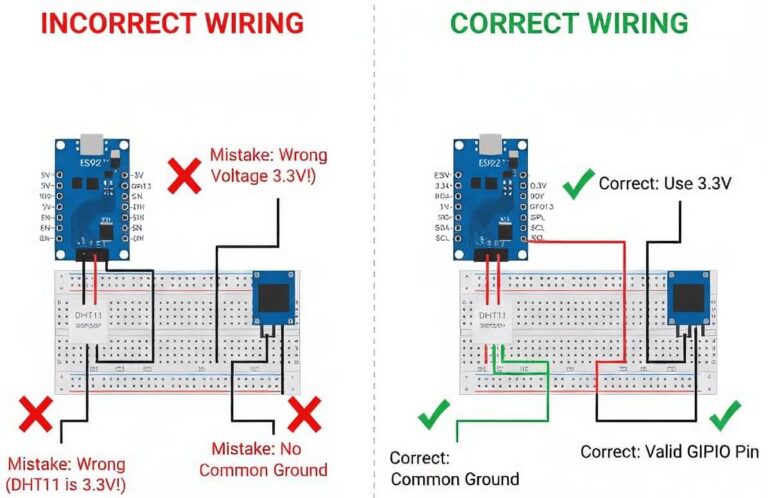
- Mistake 1: Incorrect Voltage
Always verify your sensor’s voltage requirements. While the ESP32 operates at 3.3V, some older DHT modules prefer 5V. Most modern DHT sensors work fine on 3.3V, but double-check the datasheet to avoid damaging components.
- Mistake 2: Missing Shared Ground
The ESP32 and all sensors must share the same ground. If you use an external power source for the sensor but don’t connect its ground to the ESP32, the data signal will fail.
- Mistake 3: Wrong GPIO Pin
Choose GPIO pins that support digital input. In this project, GPIO 4, 21, and 22 are standard and safe choices. Avoid using GPIO 0 or GPIO 2 if possible, as these pins are involved in the ESP32’s boot process and can cause unpredictable behavior.
Following these practices will make your project more reliable and easier to troubleshoot:
- Keep wires short and organized.
- Label connections to avoid confusion.
- Test each component individually before assembling the full system.
- Master the basics before adding Wi-Fi or cloud features.
- Neat wiring isn’t just aesthetic—it helps prevent noise and simplifies debugging.
Once your weather station is working, there are plenty of ways to expand it:
- Send data to your phone using MQTT or HTTP.
- Upload readings to the cloud for remote monitoring.
- Add additional sensors—rain, light, air pressure, or any other environmental measurement.
- Run on batteries or a solar panel for a standalone setup.
With the ESP32 and modular sensors, your weather station can scale as much as your creativity allows.
Building an ESP32 weather station is a classic project for a reason. It gives you hands-on experience, helps you create something practical, and lays the groundwork for more advanced electronics and IoT projects.
Once your station is up and running, you’ll be ready to explore custom PCB design, advanced sensor integration, and cloud-connected systems. Start small, take your time, and expand your setup as your skills grow.
If you’re ready to take your electronics projects to the next level, PCBCool can help. With fast, reliable PCB prototyping and assembly services, you can turn your ESP32 weather station—or any other electronics idea—into a polished, professional-grade device.